
Last Updated: November 10, 2026
Quick Summary
To identify vintage guitar neck cracks, first separate finish checking from wood cracks: finish checks are fine, networked lines that stay in the lacquer, while a true wood crack is a single defined line that may continue into the grain. Use a low-angle light and magnification, then run gentle, non-invasive tests. Never press on the crack or flex the neck.
- Finish checking looks like a web of fine lines that stay in the lacquer.
- A wood crack is usually a single, defined line that may follow or cut across the grain.
- Use raking light at roughly 15 to 30 degrees to reveal fine lines.
- Remove the strings before inspection so the neck is not under tension.
- Contact a luthier promptly if a crack grows, changes width or appears near the neck pocket.
Table of Contents
- Why Vintage Neck Cracks Need a Careful Inspection
- Preparing a Safe Workspace and Good Lighting for Inspection
- Step 1: Separate Finish Cracks from Wood Cracks
- Step 2: Inspect the Neck Pocket Crack on a Stratocaster-Style Body
- Step 3: Check the Headstock and Heel for Related Damage
- Step 4: Run Safe, Non-Invasive Tests on the Crack
- Red Flags That Call for a Prompt Luthier Assessment
- Documenting the Crack for a Remote or In-Person Evaluation
- Booking Your Next Step: Protecting and Assessing Your Vintage Instrument
- Frequently Asked Questions
Vintage guitar neck cracks can hide in plain sight. A small line near the neck pocket might be harmless finish wear, or it might be the first sign of a structural problem that needs a luthier. Knowing the difference protects an instrument that may be worth more than the car you drive. At Atlas C1, we work with touring players, collectors and repair technicians, and this guide walks through a repeatable way to inspect a vintage neck, step by step.
The short answer is that you look at the crack's shape, location and direction, then test carefully without putting pressure on the wood. Finish checking usually looks like a network of fine lines that stay in the lacquer. A crack in the wood tends to run in a straight line through the grain and may open or move under light pressure. This guide gives you a plan you can follow at home before you decide whether to call a professional.
Vintage instruments age in ways that make inspection harder. Old lacquer shrinks and cracks, glue joints soften, and years of humidity changes leave their own marks. That is why a careful approach matters more with older guitars than with new ones.
Why Vintage Neck Cracks Need a Careful Inspection
A neck crack on a vintage guitar is not always a problem. Many instruments carry age-related finish checking that has been there for decades. The risk comes when a crack runs into the wood, because that can affect stability, playability and the instrument's value.
Careless testing can also make things worse. Pressing on a suspect joint or flexing the neck to "see if it moves" can open a hairline crack that was previously stable. For this reason, every test in this guide is visual or very gentle.
Clear documentation matters too. If you plan to sell, insure or get a repair estimate, a record of exactly where and how the crack looks is far more useful than a vague description.
Preparing a Safe Workspace and Good Lighting for Inspection
Work on a padded, flat surface such as a bench covered with a clean towel. Remove the strings first, or at least detune them, so the neck is not under tension while you look at it. A guitar stand or a neck support keeps the instrument steady without pressing on the joint.
Lighting does most of the work in this inspection. Use a desk lamp held at a low angle, roughly 15 to 30 degrees to the surface. Raking light from the side throws small shadows into cracks and makes fine lines easier to see. Overhead light tends to hide them.
Keep a magnifying glass or a phone macro lens nearby. A ruler or a piece of tape can mark the crack's length for your notes. Good light, a stable setup and a few simple tools are enough to start.
Step 1: Separate Finish Cracks from Wood Cracks
This is the most important step. Finish cracks and wood cracks can look similar at first glance, but they behave differently and carry different levels of concern.
Visual Traits of Finish Checking
Finish checking usually shows up as a web-like pattern of very fine lines. The lines tend to be short, shallow and spread across a wide area rather than running along a single path. They often follow the shape of the finish coat, and they may appear on the back of the neck, the body or the headstock.
A common mistake is treating every fine line as structural. Age-related checking on nitrocellulose lacquer is common on vintage instruments. If the lines look like a network sitting on the surface and do not seem to continue into the grain, they are more likely finish-related.
Signs of a Crack Running Into the Wood
A crack in the wood is usually a single, more defined line. It may run straight, follow the grain, or cut across it at an angle. Look for a crack that seems to continue below the finish, shows a dark edge or a visible gap, or changes width along its length.
Pay close attention to the crack's direction. Cracks that run across the grain or straight down the neck near the joint deserve more caution. Cracks that stay short and isolated may still be finish-related, but they should be checked more closely.
Step 2: Inspect the Neck Pocket Crack on a Stratocaster-Style Body
On a bolt-on neck like a Stratocaster-style guitar, the neck pocket is where the neck meets the body. Cracks here often appear in the finish around the edges of the pocket or in the wood just beyond the pocket walls. Because this junction carries string tension, it deserves a careful look.
Start by examining the finish around the neck plate and the pocket edges with your raking light. Note whether the lines are fine and networked or single and defined. Then look at the wood surface near the pocket for any line that seems to continue past the finish.
Make sure you hold the body steady and avoid pressing on the neck while you look. If you see a defined crack that runs toward the pocket walls or the neck heel, mark its location and length. This is one of the places where a professional should weigh in. Our team at Atlas C1 often recommends sharing these close-up photos with a technician before any repair decision.
Step 3: Check the Headstock and Heel for Related Damage
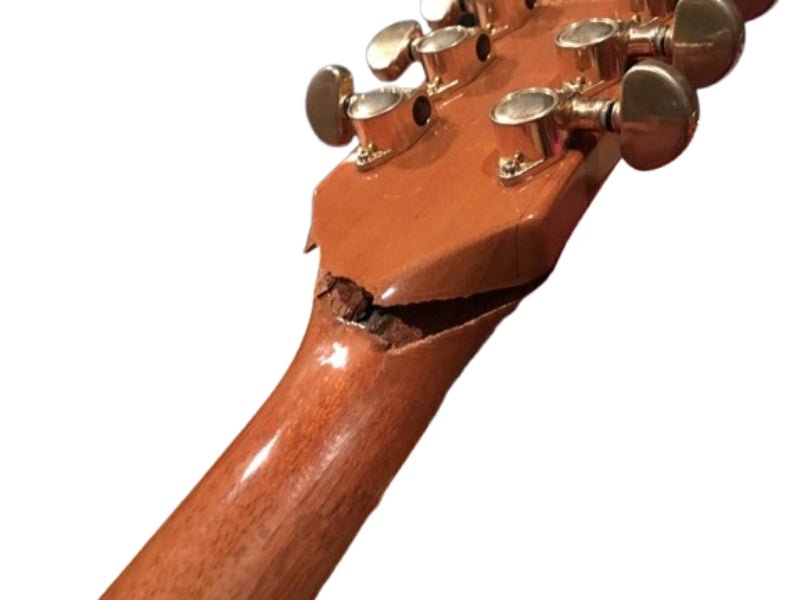
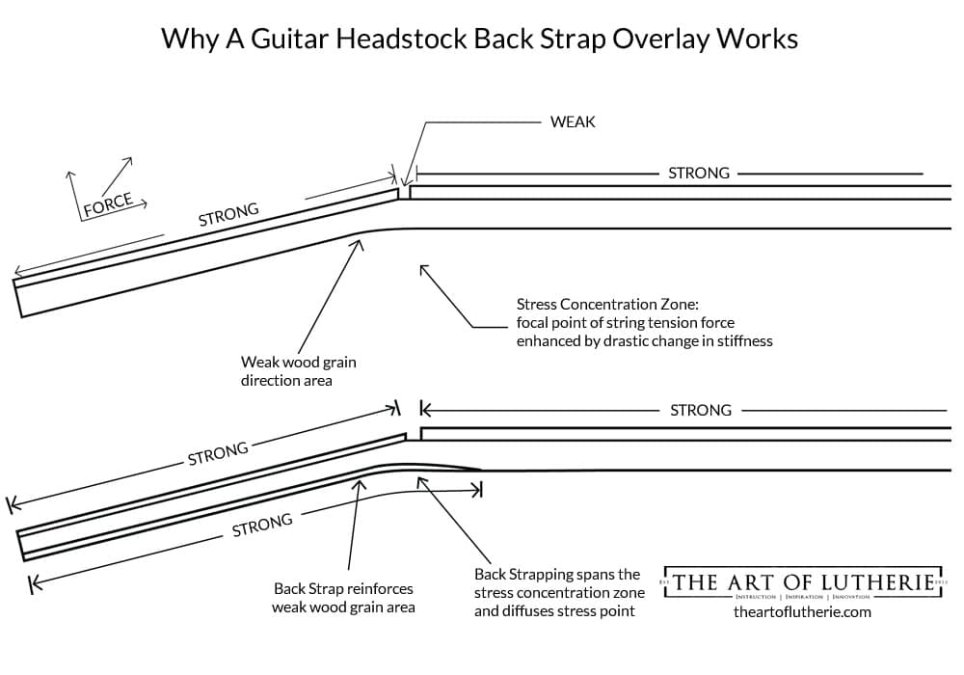
A neck crack rarely exists alone. The headstock and the heel, where the neck meets the body, can show related damage that tells you more about the instrument's condition. A headstock crack near the truss rod cavity or the scarf joint needs particular attention.
Look at the headstock from several angles, including the front, back and side. Check the joint between the headstock and the neck for gaps or dark lines. Then inspect the heel from the body side and the neck side. Lines that run from the heel into the neck are important to note.
This is also the stage where a headstock support tool can help during inspection. Holding the neck steady with a support designed for the headstock junction reduces the chance of accidental flex. The Atlas C1 headstock support and protection tool is one option many players use for this purpose, and it doubles as a repair jig for more involved work. Atlas C1 customers can also take advantage of a 10 % product discount and free shipping on this tool.
Step 4: Run Safe, Non-Invasive Tests on the Crack
Testing should stay gentle. The goal is to learn whether the crack is stable, not to prove it can be opened. Run the checks below in order, and stop at the first result that points to movement.
Test A: Magnified Edge Comparison
Under a 10x loupe or a phone macro lens, compare the two edges of the crack and the wood immediately beside it. Finish checking usually shows a clean, sharp edge that sits within the lacquer layer, with the color of the lacquer continuing into the crack. A crack in the wood often shows a different edge: the wood fibers may look darker, stained by old moisture, or slightly rounded from repeated micro-movement. Record what you see before moving on, because the same view will matter when you compare photos later.
Test B: Raking-Light Width Check
With the same low-angle light from Step 2, look along the length of the crack and note whether its visible width changes. Finish checks tend to stay uniform because they are shallow surface features. A structural crack often narrows or widens at points along its length, and a slight dark shadow can appear where the gap is greatest. Mark the widest and narrowest points with a fine pencil dot on painter's tape, not on the finish.
Test C: Support-Only Light Touch
With the strings removed and the neck resting on a support that does not press on the joint, place a fingertip on the wood beside the crack, never on the crack itself, and apply only enough pressure to feel the surface. Watch the crack under magnification while you do this. Any visible change in the gap is a reason to stop. Do not press on the headstock or flex the neck to check for movement, because a stable crack can be opened by that force.
Test D: Straightedge Baseline Comparison
If you have a previous reference, lay a straightedge along the fretboard and compare the gap under the edge to your earlier notes or photos. This check only has value if you recorded a baseline. Without one, treat the reading as a starting point for your documentation rather than a diagnosis.
Vintage-Specific Interpretation
Older instruments need extra context. Nitrocellulose lacquer on vintage guitars shrinks and checks over decades, so dense finish checking alone is often benign. Glue joints from the original build can also soften unevenly, which means a crack that looks new may simply be exposing an old repair line. Note whether the guitar has been stored in a damp or very dry environment, because humidity swings are one of the most common drivers of movement in aged necks.
Watch out: a crack that looks stable under light but opens when the guitar is restrung, tuned up, or moved to a different room should be treated as active and examined by a technician before any further handling. Learn how neck fatigue progresses before booking an assessment.
The four checks below run from gentlest to most involved; stop at the first sign of movement.
| Test | What to look for | Stop if |
|---|---|---|
| A: Magnified edge comparison | Clean edge in lacquer (finish) vs. darker, rounded wood fibers (wood) | Edge looks wood-like and darkened |
| B: Raking-light width check | Uniform width suggests finish; changing width suggests structure | Width changes along the crack |
| C: Support-only light touch | Fingertip on wood beside the crack, never on it | Any visible change in the gap |
| D: Straightedge baseline comparison | Gap under straightedge vs. earlier notes or photos | No baseline recorded (treat as a starting point only) |
Red Flags That Call for a Prompt Luthier Assessment
Some findings should not wait. Contact a qualified luthier or guitar technician soon if you notice any of the following:
- A defined crack that runs into the wood, especially near the neck pocket or heel; see whether a volute is needed if the crack affects neck strength.
- Any visible gap or movement at a joint
- A crack that changes width or looks darker along its length
- Lines that cross the grain or run straight down the neck near the joint
- Changes in neck relief, action or tuning stability that appear suddenly
- A crack that has grown since you last checked it
Vintage instruments also deserve extra caution because repairs can affect value. A documented, professional assessment protects both the instrument and your records.
Documenting the Crack for a Remote or In-Person Evaluation
Good documentation lets a technician triage your instrument before you ship it or book a visit, and it gives you a baseline to check against later. Most evaluations stall because the photos do not show the right things, so plan your shots before you begin.
The Five-Shot Set
Take these five images under the same raking light from Step 2, with the guitar in the same position each time:
- Full-neck view from the back, showing the entire neck, the heel, and the body joint in one frame.
- Headstock front and back, so any related crack at the scarf joint or truss rod cavity is visible.
- Crack overview at roughly 20 cm, showing the crack's full length against the surrounding wood.
- Crack close-up at about 5 cm, filling most of the frame, with the lens parallel to the surface to avoid distortion.
- Oblique angle at 30 degrees, to show depth and whether the edge is raised or sunken.
Scale References
Place a metric ruler or a strip of painter's tape with millimeter marks in the frame for every crack shot. Lay the scale along the crack rather than beside it, so its length and position read clearly. A coin or a credit card is useful for overview shots, but a ruler is more precise for measuring length and width.
Notes to Record With Each Photo Set
- Crack location described by reference points, such as "neck pocket, bass side, 4 mm from the body edge"
- Direction: with the grain, across the grain, or at an angle, and the approximate angle in degrees
- Length, width at widest point, and whether the width changes along the crack
- Whether the edge looks like finish or wood, using the criteria from Step 1
- Date, room humidity if you have a hygrometer reading, and any change in action, relief, or tuning stability
- Strings and tuning at the time of the photos, since tension changes what the crack looks like
Storing the Record
Keep the originals in a dated folder, and send a compressed copy to the technician. Avoid heavy editing or filters, because a luthier needs to see the true color of the edges. A short text file with the same notes as the photo names makes remote review much faster.
Watch out: do not clean the crack with solvent or polish before photographing it, since cleaning can remove the dark staining that helps a technician judge age and movement.
Booking Your Next Step: Protecting and Assessing Your Vintage Instrument
Finding a crack does not mean the instrument is lost. Many vintage necks with finish checking remain stable for decades, and early, careful assessment is what keeps small issues from becoming major repairs. If repair is the next step, read the guide to finishing a guitar neck after repair. If your inspection raised questions you cannot answer, a professional evaluation is the right next step. Once you know what you are dealing with, you can decide how to protect the neck during storage and travel, and whether a repair is worth pursuing.
For ongoing protection, a headstock support and protection tool can reduce stress on the neck junction during transport and storage. Pair that with regular visual checks, stable humidity and careful handling, and your vintage guitar will stay in playing shape for years. Shipping on Atlas C1 orders is free, so you can get the tool to your bench without added cost.
Long Live the Six String™
The Science of Harmony through innovation and design.
Frequently Asked Questions
Can a cracked guitar neck be fixed?
Many neck-pocket cracks can be repaired by a qualified luthier, but the outcome depends on whether the crack is only in the finish or runs into the wood. Finish checking is often cosmetic and may need no structural work at all. A crack that has separated the wood at the neck joint generally requires professional assessment, and repair methods vary with the instrument's age, construction and finish. Pricing depends on the repair scope, so contact a local luthier for a quote before proceeding.
Is a neck pocket crack on a Stratocaster-style guitar a cause for concern?
A neck pocket crack on a Stratocaster-style guitar is worth a close look, but not every crack signals a serious problem. Fine, web-like lines in the finish near the neck pocket are often age-related checking. Cracks that extend into the wood, change the neck angle, or cause movement at the joint deserve prompt attention from a luthier. Document what you see and keep the instrument under stable humidity while you arrange an assessment.
How can you tell whether a guitar crack is only in the finish?
Look at the crack under angled light and check whether the line follows the finish surface or continues into the wood grain. Finish cracks tend to be thin, shallow and irregular, while structural cracks often run cleanly along the grain and may show a slight gap or raised edge. Compare the crack to the surrounding grain and note its length and direction. When you cannot decide from visual evidence alone, a luthier can make the call.
Should you keep playing a vintage guitar with a neck crack?
Playing a guitar with a neck crack is a judgment call that depends on the crack's location and behavior. If the crack is confined to the finish and the neck feels stable, playing it is usually low risk. If you notice the neck shifting, buzzing that changes over time, or a visible gap at the joint, stop playing the instrument and have it inspected. Continued stress on a structural crack can make a repair more involved.